A few months ago I wrote a tutorial showing you how to backup your files in Windows Vista. In this article I will show you how to restore those backups using the Backup and Restore Center.
In the search field of the Start Menu type the word 'restore' and then click on the Backup and Restore Center shortcut. Alternatively, you can go to Control Panel -> System and Maintenance -> Backup and Restore Center.

Backup and Restore

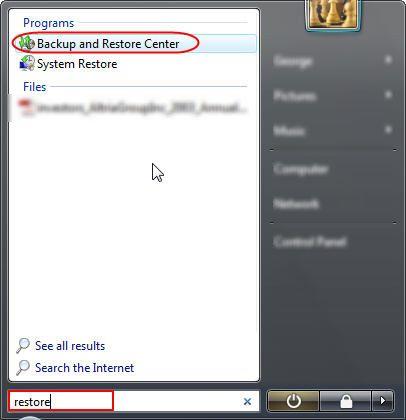
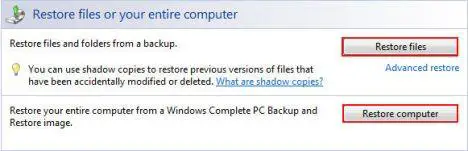
In the Restore files section, you have two options: Restore files and Restore computer. In this tutorial, I will cover the Restore files procedure.

Backup and Restore

How to restore files
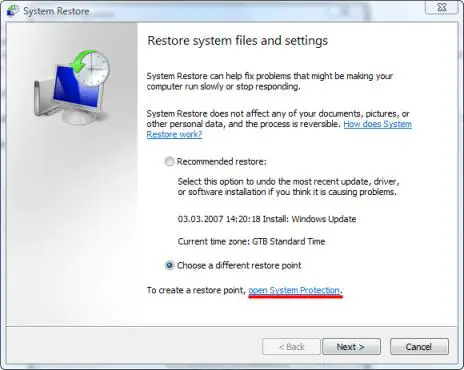
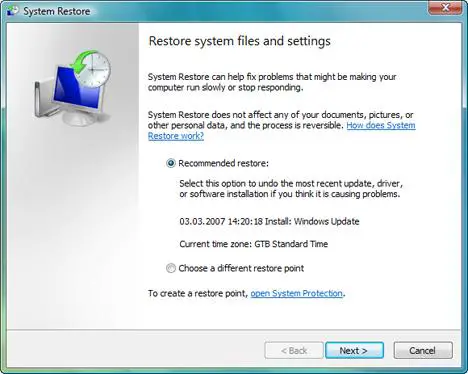
After clicking on the Restore files button, the wizard will ask if you want to restore files from the latest backup or from an older one.

Backup and Restore

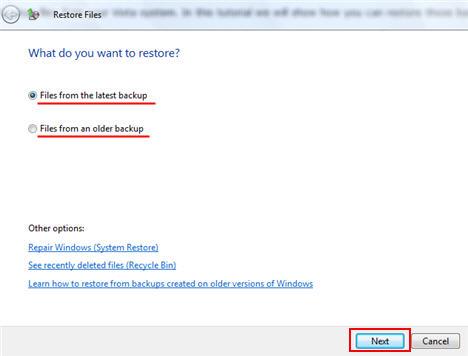
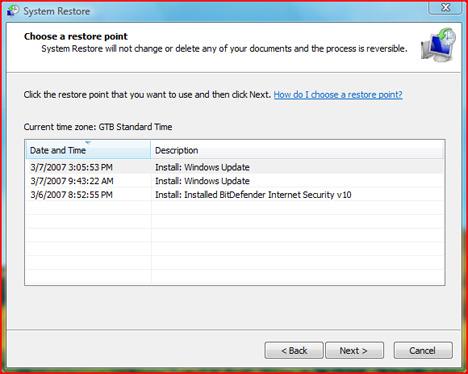
Choose the option you prefer and then click Next.


Backup and Restore

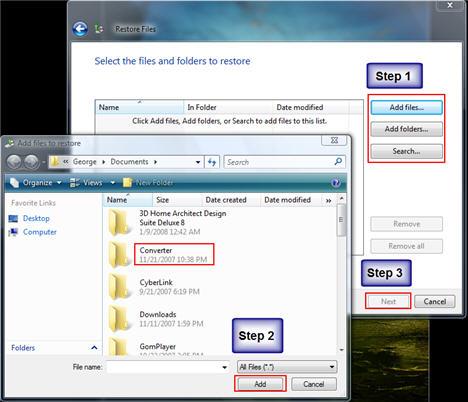
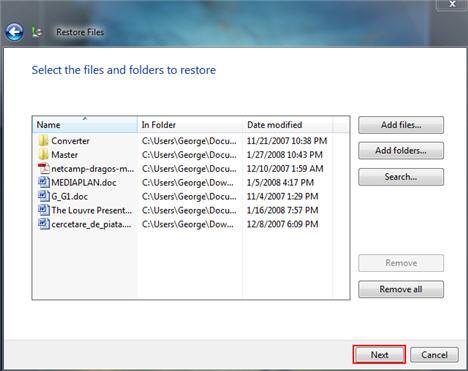
Now you have to browse and add the files and folders that you want to restore.
First, click on the Add files or Add folders button. Then, find the files or folders that you want to restore, select them and click on the Add button. Repeat this procedure until all the files or folders that you want to restore are present in the Restore Files window.
Notice: You are allowed to browse only through files and folders that were previously backed-up.

Backup and Restore

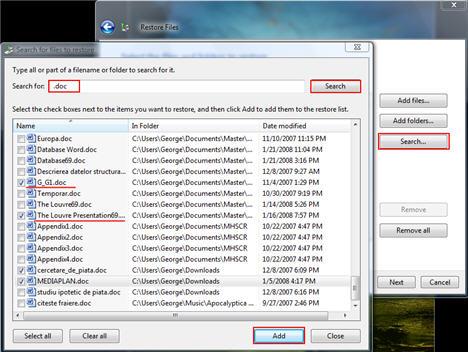
If you can't find a specific file or folder click on the Search button. Then, type the name of the folder/file in the search field and click on the Search button. If the folder/file has been found, select it and click on the Add button.

Tip: If you don't know the name of the file you are looking for, but you do know what the file type, you can search for all the files that have the same extension (.doc, .mp3, .xls, etc.) as the file you are looking for. For example, type '.doc' in the search box and click on the Search button.

After you have finished adding the files or folders that you want to restore, click on the Next button.

Backup and Restore

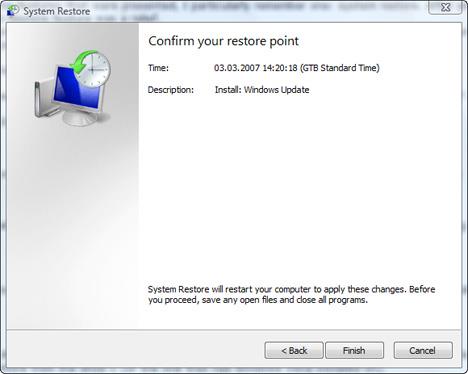
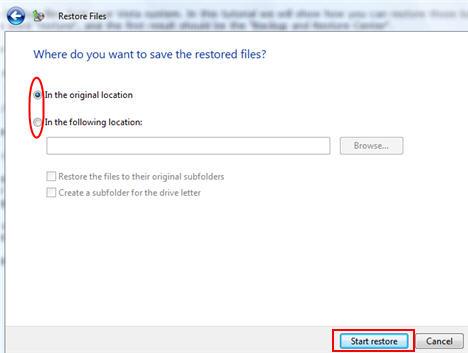
Now, you will be asked if you want to restore the files in their original location or in a different one. Choose the option you prefer and then click on the Start restore button.

Backup and Restore

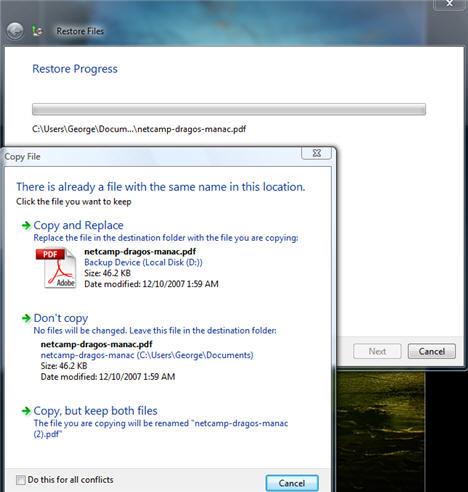
Notice: If the same file that you want to restore is found in the same location, you will be notified and you will have to choose one of the following options: 'Copy and Replace', 'Don't copy', 'Copy, but keep both files'.

Backup and Restore

After a while, the restore process will be completed. Once you are notified that the files were restored, click on Finish.

Backup and Restore

NOTE: Windows Complete PC Backup and Restore is not included in Windows Vista Home Basic or Windows Vista Home Premium.


System Restore is a feature that allows users to restore their system to a previous state. It offers a way to undo all the changes in the system files,registry keys, installed programs, etc, to a previous state, without affecting personal files such as documents, photos or e-mails. It was first implemented in Windows Me and since then it was included in both Windows XP and Windows Vista.
By default, Windows Vista creates the so called "restore points" every day. The restore points are created automatically, before any significant system event such as the installation of a program, device or system update. Also, restore points can be created manually by the user.
When something goes terribly wrong with your system you can restore it to a previous state and you will be able to use it again. In this tutorial we will show you how to do that usingSystem Restore.
There are several ways to find System Restore. The easiest is to type "system restore" in theStart Menu search field and press Enter or click on the search result.

Start Menu

The main System Restore window will open. You have two options: to restore your system to a previous restore point or to create a new restore point.
First, we will show you how to create a restore point.

System Restore

In the lower part of the System Restore window you should see a link saying open System Protection. Click on in.

System Properties

A new window called System Properties will pop-up. Here you can select the drives which will be included in the restore point. To select them, simply click in the appropriate check-boxes and then click the Apply button.

System Properties

Now you can create a custom restore point for the selected drives. To do that, click the Createbutton, type the name for the restore point, and click the Create button once again.

System Properties

Windows Vista will create the restore point for the drives you selected. After a while you will receive the confirmation that the restore point was created.

System Protection

To restore your system to a previous state you can use the recommended restore point or you can choose a different one. The Recommended restore option will restore your system to the most recent restore point.

System Restore

If you select the second option, after you press the Next button, you will see a list of available restore points. Select the one you prefer and press the Next button once again.

System Restore

Now you are asked to confirm your restore point. Click the Finish button and System Restore will restart your computer to apply the necessary changes.

System Restore

When the process is finished your system will be back to the state you selected.


These instructions are meant for residents of Palo Verde, Verano Place, Gabrielino, and Santiago apartments.
Use the following checklist to ensure that your computer is configured correctly for use in Palo Verde, Verano Place, Gabrielino, and Santiago apartments.
  1. You should connect an ethernet cable from wall jack directly into the WAN port on your router/access point.
  2. We recommend that you have some kind of encryption enabled- at least WEP, and preferably WPA or WPA2 which are far more secure than WEP.
  3. We also recommend (for increased security) that you enable MAC filtering. This feature allows you to identify which wireless cards the router will "speak" to, and it can specify that your router ignore all other ethernet cards. This ensures that only computers you approve of can use your access point. You can find your MAC address by clicking Start -> Run, typing "cmd", clicking "Ok", and then typing "ipconfig /all" in the console window that pops up. Your MAC address is listed next to Physical Address. If you have more than one network adapter, such as an ethernet and wireless, you probably have more than one MAC address. Make sure to use the one from the wireless adapter.
The following is a guide to give you a general idea of how to configure your router/access point. The guide uses a Linksys WRT54G as a basis.

Step 1 – Resetting

Img1
  • Connect the power cord
  • Unplug ALL Ethernet connections
  • Hold down the reset button forat least 15 seconds

Step 2 – Cable Setup


Img2

  • Connect your computer (PC or MAC) to any one of the LAN ports, only
  • Connect the Internet (WAN) Port to ResNet


DO NOT connect the wall port to any port on the Router yet!


Step 3 – Accessing Router

Img3
  • Open Internet Explorer (with the computer connected to the Router)
  • Enter 192.168.1.1 into the Address Bar, push Enter
  • Leave the User Name field blank
  • Under the password field enter “admin”
  • Click “OK”

Step 4 – Default Screen

Img4

Top of page
Step 5 – Setting a Password
IMPORTANT: Protect your Router from being tampered with by other residents by setting a password!

Img5
  • Click “Administration”
  • Enter a desired password into the “Router Password” field
  • Click “Save Settings”
Step 6 – Configure Wireless SSID
Img6
  • Click “Wireless”
  • Click “Basic Wireless Settings”
  • Enter a desired name into the “Wireless Network Name (SSID)” field
  • Write down your Wireless Network SSID, it will be used for later.
  • Click “Save Settings”

Step 7 – Configure Wireless WEP or WPA Security Key
You must secure your wireless network, failure to do so may result in disconnection by ResNet. We recommend that you use WPA instead of WEP.
Img7
WPA
For WPA (recommended)
  • Click “Wireless”
  • Click “Wireless Security”
  • Select “WPA Pre-Shared Key” in the “Security Mode” field
  • Set the "WPA algorithm" to "TKIP"
  • Type in your WPA Shared Key. It should be between 8 and 32 characters- the longer the better. Make sure it is something you can remember but that is hard to guess. You may want to write it down, temporarily, so that you can remember it for when you configure your computer to connect to the now-secure access point.
  • Click “Save Settings”
For WEP:
  • Click “Wireless”
  • Click “Wireless Security”
  • Select “WEP” in the “Security Mode” field
  • Bubble “1” under the “Default Transmit Key” field
  • Select “128 bits 26 hex digits”
  • Enter a desired passphrase into the “Passphrase” field
  • Click “Generate”
  • Carefully write down the code generated in the “Key 1” field on paper, and store it in a safe place. THIS IS YOUR WEP KEY, it will be needed later on.
  • Click “Save Settings”

Step 8 – Final Cable Setup


Img8

  • Connect your computer (PC or MAC) to any one of the LAN ports, only
  • Connect the wall port to a WAN port on your Router

Img9


Connecting a Windows Computer Through Wireless
Step 9 – Go To Control Panel

Img11
  • Click on the Start Menu, and click on Control Panel.


Step 10– Switch to Classic View
Img12

Step 11– Go to Network Connections
Img13
  • Find and double-click “Network Connections” to open up the list of connections that your computer uses to connect to the internet.


Step 12– Network Connections
Img14

  • Right click “Wireless Network Connection” and select “Properties”.

Step 13– Wireless Network Connection Properties


Img15
  • Go to the “Wireless Networks” Tab

Step 14– Adding a Wireless Profile
Img16
  • Check “Use Windows to configure my wireless network settings”, if it isn't already.
  • Click “Add” to add a wireless profile.

Step 15– Making a Profile
Img17
  • Enter in the Network name (SSID). (It was your desired SSID from Step 6 ).
  • Uncheck the box “The key is provided for me automatically”.
  • Put in the “Key 1” code from Step 7 into “Network key” and “Confirm network key”.
  • Push “OK”


Software ports are numbered connections that a computer uses to sort types of network traffic. A port may support incoming traffic, outgoing traffic, or both. A few services, such as FTP (on port 21), and HTTP (on port 80), are assigned by default to open ports where operating systems can easily find them easily. When a port is opened a service is assigned to it, for example, an online game. For security, by default all ports to the Internet, and most LAN ports are closed so that traffic cannot flow through them.

Common ports are listed in Port Numbers for Port Forwarding.

To test whether your port forwarding is secure, see How Are a Computer's or a Router's Ports Secured?
Click link for your router's instructions. (There may be more information in the online manual.)


Instructions for RP614, MR814, WGR101, WGR614, WGT624, WGT634U, WGU624, WGM124, or WPN824
These routers do port forwarding by assigning port numbers to a "service" that is associated with the application you want to run.
To Let an Application Use Port Forwarding
  1. Type the router's address in an Internet browser's address bar. (By default the router's address is 192.168.0.1). The Setup Wizard appears.
  2. Enter the router's username and password.
  3. Under Advanced, click Port Forwarding on the left menu bar.
  4. A Port Forwarding Screen (Varies Slightly by Router)
  5. From the Service & Game (or Service Name) pull down, select the service that you will host. The services the router knows about are listed here. If the service does not appear in the drop down, add a service as described in the next section, then return to this step.
  6. Enter the IP address of your local server in the Server IP Addressbox.
  7. Click Add.
  8. Click Logout to exit from router settings.
To Add a Service for These Routers
To define a service not in the Service Name list, determine what port numbers are used by the service.
  1. Click Add Custom Service.
  2. Enter the first port number in an unused Start Port box.
  3. If only one port number is to be forwarded, enter the same number in End Port. To specify a range of ports, enter the last port to be forwarded in the End Port box.
  4. Enter any name you choose for the service.
  5. Click Apply.


Instructions for DG834, DG834G, DG824M, FR114W, FM114P, FR114P, FR328S, FVL328, FVS328, FVS338, FVX538,
FWAG114, FWG114P, or FVS318v3

These routers do port forwarding by assigning port numbers to a "service" associated with the application you want to run. "Rules" are set for particular services. Rules block or allow access, based on various conditions such as the time of day and the name of the service.
To Create a New Inbound or Outbound Rule
  1. Submit the router's address in an Internet browser. (The default is 192.168.0.1).
  2. Enter the router's username and password.
  3. From the main menu, click Security > Rules.
  4. Click Add for inbound or outbound traffic, as appropriate to the application you are planning to run.
  5. Select the Service. The services the router knows about are listed in the drop down. If the service you want is not listed, add it as described in the next section.
  6. Select the Action, for example ALLOW always.
  7. For Send to LAN Server, enter the IP address of the local server. Note that this is also the IP address the computers on your LAN will access.
  8. For WAN User choose Any, or limit access to particular IP addresses.
  9. For Log selection it is reasonable to turn logs on, especially at the beginning when you are unsure of the result of the changes you are making. Later, you may want to set logs to "Never" for performance reasons.
  10. Click Apply.
As noted in user manual for some models:
  • Consider using the Dynamic DNS feature on the Advanced menu, so that external users can find your network when the DHCP lease is renewed by your ISP.
  • If your own LAN server uses DHCP, and your IPs change on rebooting, consider using the Reserved IP Address feature in the LAN IP menu.
To Add a Service for These Routers
  1. Click Security > Services > Add Custom Service.
  2. Enter any name you choose for the service.
  3. Select whether the service is to use TCP or UDP. If you are unsure, select both.
  4. Enter the lowest port number used by the service.
  5. Enter the highest port number used. If the service uses only one port number, enter the same number.
  6. Click Apply.


To Enable Port Forwarding for RM356, RH340, RH348, RT388, RT311, or RT314
  1. Click Start > Run.
  2. Type telnet 192.168.0.1.
  3. Type the password at the prompt. The default is 1234. The router menu appears.
  4. Type 15, and press Enter to select SUA Server Setup. The Port Forwarding screen appears.
  5. Enter the port number and your server's IP address.
  6. Press Enter repeatedly until the cursor comes to the last line and saves the changes.
  7. Type 99 to exit from the router settings.


To Enable Port Forwarding for FVM318 or FVS318v1 and v2
These routers do port forwarding by assigning port numbers to a "service" associated with the application you want to run.
To Let an Application Use Port Forwarding
  1. Type the router's address in an Internet browser's address bar. (By default the router's address is 192.168.0.1). The Setup Wizard appears.
  2. Enter the router's username and password.
  3. Click Advanced > Ports on the left menu bar.
  4. Click Add. The Add Service screen appears.
  5. If you click the Service Name drop down, a list of services that have been defined appears. (Some are always added by NETGEAR for your convenience by default.) If the service does not appear in the drop down, add a service as described in the next section, then return to this step.
  6. Set Action to ALLOW always.
  7. Enter the IP address of your local server in the Server IP Address box.
  8. Set WAN Users Address to Any.
  9. For the Log selection it is reasonable to turn logs on, especially at the beginning when you are unsure of the result of the changes you are making. Later, you may want to set logs to "Never" for performance reasons.
  10. Click Apply.
  11. Click Logout to exit from router settings.
To Add a Service for These Routers
  1. Determine what port numbers are used by the service.
  2. Click Security > Add Service. The Add Custom Services window appears.
  3. Enter the first port number in an unused Start Port box.
  4. If only one port number is to be forwarded, enter the same number inEnd Port. To specify a range of ports, enter the last port to be forwarded in the End Port box.
  5. Enter any name you choose for the service.
  6. Click Apply.


To Enable Port Forwarding for MR314 or RP114
  1. Type the router's address in an Internet browser's address bar. (By default the router's address is 192.168.0.1).
  2. Enter the router's username and password.
  3. Click Advanced > Ports on the left menu bar.
  4. Enter the first port number in an unused Start Port box.
  5. If only one port number is to be forwarded, enter the same number in End Port. To specify a range of ports, enter the last port to be forwarded in the End Port box.
  6. Enter the IP address of your local server in the Server IP Addressbox.
  7. Click Apply.

Blog Archive

Powered by Blogger.