Some times we need to forward some ports in Router firewall for the proper functioning of certain applications. While playing some online games you need to perform port forwarding on your Router as router has an inbuilt firewall.


Steps to perform port forwarding on Linksys WRT54G Router


1. Log on to Linksys Router setup page

2. Click on Applications and Gaming

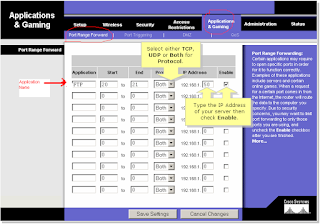
3. Click on port range forward


Port forwarding on WRT54G Wireless Router

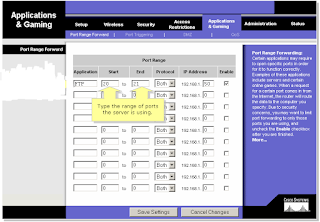
4. Enter the details of the port which we need to forward on this router as shown in image.


Port Range forwarding on WRT54G
5. After entering the port details click on save settings.

Many times its heard that configuring Linksys WRT54G Wireless G Router in PPPOE mode is difficult. So I have made a simple tutorial to configure WRT54G Wireless Router in PPPOE mode with simple steps and images.

Configure WRT54G Wireless Router in PPPOE mode


Step 1: Make sure that you can go online by connecting your computer to the modem (Without connecting WRT54G router in the network).

Step 2: Connect your computer to the one of the LAN port of WRT54G.

Step 3: Connect the modem to the WAN Port of WRT54G and all devices should be powered on.


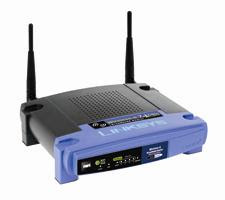
Setup Linksys WRT54G Wireless Router Linksys Wireless G Router

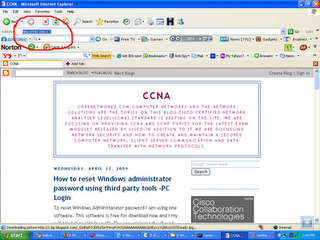
Step 4: Open Internet Explorer and type the default IP Address of the Router. The default IP address of WRT54G is 192.168.1.1 and press enter.


Log on to Linksys WRT54G Wireless Router by typing the router IP address
Step 5: After Entering the default user name and Password you will log on to the Router Setup page.

Default user name : {mo user name}
Default Password : admin


Setup Page of Linksys Wireless G Router

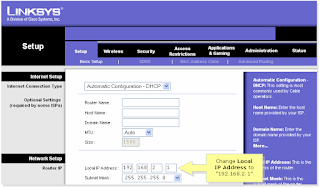
Update: To configure in PPPOE there is no need to change the current Local IP Address.

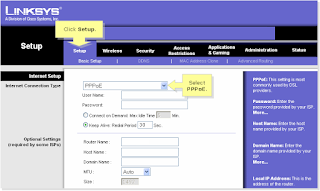
Step 6: On setup page select PPPOE instead of "Automatic Configuration DHCP"


Configure Linksys Wireless G router in PPPOE mode

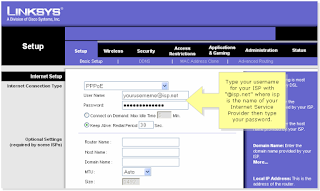
Step 7: Enter the user name and Password provided by your Internet Service Provider and click on save.


Enter PPPOE settings on WRT54G Wireless Router


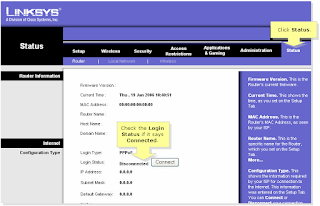
Step 8: Click on status bar and click on connect button.


Connecting to PPPOE server by clicking connect button

In this article I am presenting the steps to configure D-Link Wireless Access Point DWL-G700AP in simple steps. Before configuring the Access Point we need to assign static IP address on your computer and connect Access Point to your computer using an Ethernet cable.


How to setup DWL-G700AP by running Wizard

To configure DWL-G700AP follow the steps below.

1. Assign static IP address on your computer

If there is no other DHCP server connected to your computer you need to assign a static IP address on your computer. It should be in the range of 192.168.0.X

Where X should be between 1 to 254 except 50.

To know how to assign static IP address on your computer click on the link below.

Assign static IP address from command prompt


2. Connect your computer to Access Point

You should connect the Wireless Access Point (DWL-G700AP) to your computer using an Ethernet cable and power on the Access Point.

3. Access the Configuration page from your computer

To access the configuration page of D-link Access Point DWL-G700AP ,open your Internet Explorer or other browser and type 192.168.0.50 on the address bar. Press enter.

Now it will prompt you to enter admin user name and password to log on. Enter the following details.

Default admin username: admin
Default admin password :

There is no default admin password.

4. Click on Run Wizard

Configure D-Link Wireless Access Point DWL-G700AP by running Wizard

Now it will show the next steps in configuration. Click next.

Configure D-Link Wireless Access Point  DWL-G700AP


Now the wizard will prompt you to set a new password for the Access Point. You need to confirm the Access Point password.

Configure D-Link Wireless Access Point

After set the password click next.

Wireless Access Point DWL-G700AP

After Selecting the SSID and wireless channel, click Next.

Setup wireless encryption on DWL-G700AP


Now you need to select the Wireless encryption which matches the Wireless router. After selecting the encryption you need to enter the wireless key. Now click Next to continue.

Finish the Configuration of DWL-G700AP


Now you need to click on the Restart button. After restarting the Wireless Access Point you can use it on your network.